November 26th, 2003
Our Cars: Water Pump for the 308GTB QV
By Pete Vack
In which we tell you what we are doing, (not how you should do it), why it must be done, parts sources, good and bad, and how much it costs.

|
 Water pumps on 308s aren't a strong point. Best to replace rather than
run the risk of overheated heads.
Water pumps on 308s aren't a strong point. Best to replace rather than
run the risk of overheated heads.
|
Water Pump Failures
One of the more interesting aspects of maintenance is that the more you do the more you�re going to do.
With the 308 up on jacks, the fenderwells out, the deck lid removed, the a/c unit pulled back out of the way, I noticed the water pump at one time had slight seepage. Never having replaced it, and knowing the bad reputation of 308 (and 328) water pumps, it might be a good idea to do it now. Rick Dean, from Savannah, mentioned to me that he always replaced the water pumps on every used 308 and 328 he brought into his exotic car dealership, and told me to do the same, now. I stared at the pump and didn't even want to ask what a new one costs; it would have simply been cost-prohibitive. Yet I agreed it should be done.
So I called up Rutlands � again (800-638-1444). Do they have rebuilts? Yes. What's the cost with the core returned? $225. Ok, that I can live with. And don't forget to send the gaskets. He didn't.
While I waited for the new pump, I removed the old one from the engine. This was not difficult in my case, because the access to the hose clamps which run underneath the plenum intake manifold were accessible. The hoses came off easily from the two piece water pump/thermostat housing. I can tell that this
may not always be the case.
The unit then removed easily from the car. All I had to do was to remove the water pump from the housing itself. A simple task.
But it wasn't. Both pieces are cast aluminum. One must be VERY careful with aluminum housings. They warp with heat, they chip, they scar very easily and gasket surfaces must not be distorted or even slightly damaged. There was no place to tap one side against the other. The gasket glue was worse than epoxy. The two units would not come apart. Per above, never, ever, pry two pieces of aluminum apart with any kind of metal tool. Oh, I knew that. But it wasn't budging no matter what I did.
|
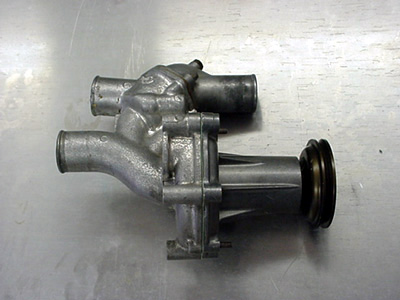
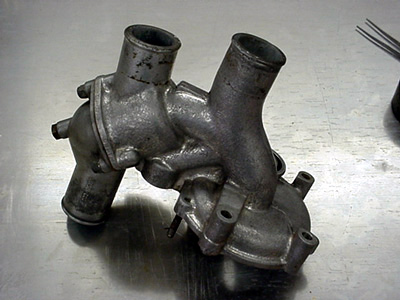 The thermostat housing. Be very careful when separating this from the pump.
|
I finally gave up and let it sit overnight soaking in WD-40 - an idea put forth by Erik Nielsen (that doctorate in engineering must be good for something) - This would at least soften the gaskets. The next day, with much careful tapping, (through the porthole in one side to the face of the other) it finally began to break loose. More WD-40 and wooden door shims to carefully split the casing finally did the trick. But the culprit wasn't the gasket as I had thought. There are two ferrous metal sleeves in the bolt holes. Iron and aluminum don't really like each other, particularly in moist situations. A tight fit with a bit of corrosion can make life miserable. So be forewarned, you'll probably need more time than you figured to replace a water pump on a 308.
|
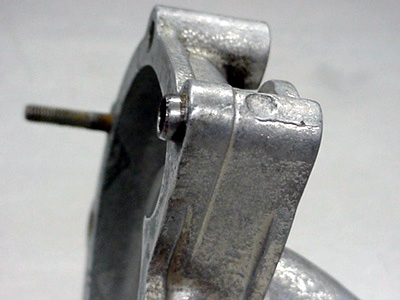 The culprit. The sleeves create separation hardships.
|
However, it was smart to replace the pump. Even though it was not giving any trouble, I found that when rotating the pump by hand there was a great deal of resistance, then none for a few degrees, then resistance again. Certainly the bearings or packings inside were not up to par.
But like our friends at AutoWeek say, "But wait, there's more." Having separated the pump itself from the thermostat housing (change the thermostat at the same time - you know, the more you do...), and having received the new rebuilt unit from Rutlands (again it took only three days), I noted that oh, you have to remove your pulley from the old pump and put it on the new pump. Ok, we can do that. Undo the nut and tap a little on the pulley and whambamthankyoumam.
|
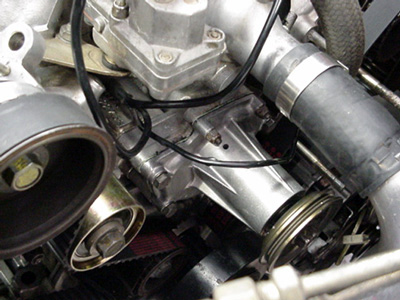
 The water pump hoses are hidden under the plemun chamber and can be difficult to remove if the clamps aren't aligned for easy access.
|
Not. First, there is no place to hold the shaft on which the nut is no doubt tightly screwed down. No place. No where. The pulley itself is perhaps a cast alloy bronze, but fragile looking. It didn't look like it would strike up a great relationship with a vice. I removed the impeller at the other end of the pump. This revealed a squared shaft, something a wrench would fit on to stop the shaft while the nut was removed.
This we did with great trepidation, trying a breaker bar first, then an air rachet. A big air rachet. Neither worked. I checked the direction of the threads � they seemed to be normal clockwise-tighten threads. I tried several more times, and then quit, fearing damage to the core or shaft. The core is worth big dollars, and we don�t want to lose that money.
I called a couple of local machine shops, but then reconsidered. They'd do the same thing I was doing but with a bigger hammer. And if they damaged the old core, well, that was still my problem, not theirs.
|
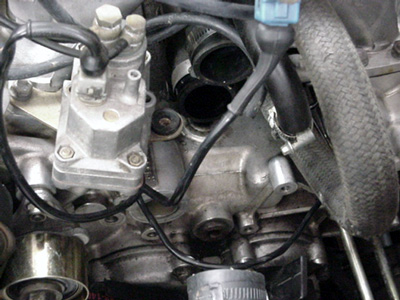
 The new water pump as fitted to the thermostat housing. Removing the pulley
nut was easy - I simply returned it to Rutlands and they did it for me!
The new water pump as fitted to the thermostat housing. Removing the pulley
nut was easy - I simply returned it to Rutlands and they did it for me!
|
I thought this was supposed to be a simple job, the hardest part being writing the check. But that nut just wasn't going to come off on my watch.
So I called Mark at Rutlands and explained the problem. He told me to send both the old and new pump back and they would change the pulleys. That sounded easy, aside from another $20 in shipping. But at least if they couldn�t get it off it was their problem, not mine, or so I hoped. I know when to quit and call in the experts. And that's half the battle of the Do it Yourselfer.
|
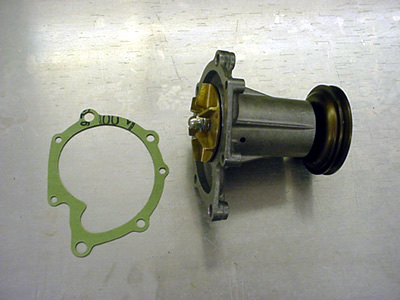 New water pump with gasket. Don't overlook the o ring gasket on the thermostat
housing.
New water pump with gasket. Don't overlook the o ring gasket on the thermostat
housing.
|
Rutlands had the new pump fitted with the old pump and returned to me
in about 10 days, not bad considering weekends and three day shipping.
It was now ready to put back in the car, which went very smoothly after
all the initial fuss.
Clearance Check
It is also a good idea to check the impeller clearance per the manual before
assuming that all is ok. Use a piece of clay, duct putty or whatever else
works, lay it on the impeller blade and put the pump on the housing complete
with the new gasket. The proper clearances are on the diagram below.
|
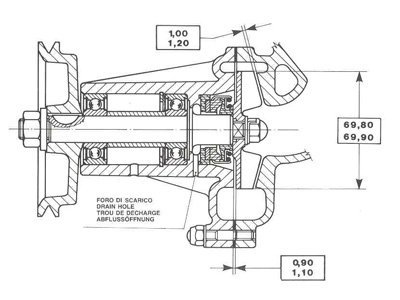 Here are the specs for checking the water pump. I have no idea where the
diagram came from.
Here are the specs for checking the water pump. I have no idea where the
diagram came from.
|