December 3rd, 2003
Our Cars: Cambelts for the 308GTB QV
By Pete Vack
In which we tell you what we are doing, (not how you should do it), why it must be done, parts sources, good and bad, and how much it costs.

|
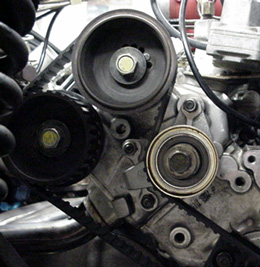 This is the access to the rear bank, with the new belts and tensioners
already in place. The front bank is a bit more difficult to reach.
This is the access to the rear bank, with the new belts and tensioners
already in place. The front bank is a bit more difficult to reach.
|
The Great Cam Belt Controversy
There has been a lot of controversy about Ferrari cam belts. The question is, why do I have to change the belts every 30,000 miles on a Ferrari, when my Honda goes 90-100,000 miles without a change?
To make a long argument short, one factor is the cost associated with belt failure; losing a belt in a 308 will definitely result in damaged valves, possibly pistons, due to the close interference fit. The Honda and similar vehicles don't have this problem. Other considerations are the high performance cam lift and spring rates of the Ferrari which put a heavier load on the belts; traditionally poor camshaft seals which result in oil on the belts; and since Ferraris often sit for long periods of time, the belts tend to develop a set, much like tires, from long periods of inactivity. Belt replacement is the first thing potential buyers will ask about, and, lastly, it's obviously good for the dealers.
|
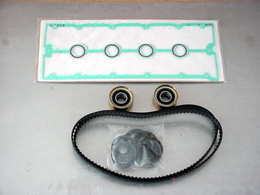 The whole nine yards. Note the new cam seal gaskets are all in a kit
in one plastic bag. All were ordered from Rutlands at 1-800-638-1444.
The whole nine yards. Note the new cam seal gaskets are all in a kit
in one plastic bag. All were ordered from Rutlands at 1-800-638-1444.
|
I won't recommend any interval, that's for others to do. In my case, the belts were almost ten years old, and on that basis alone well worth changing. I'd do it by the book, or within 8 years, after that. And always better safe than sorry.
That being said, changing the belts is an easy, no sweat job. If you do it everyday. Belts can be changed fairly simply if the camshafts aren't removed. Here's the cost breakdown if you do the complete job:
Costs
Again, I have an invoice here, and my cost is your cost, (or more, as I don't get any type of discount).
Kit, cam belts and tensioner bearings 245.00
Kit, cam+distributor O rings and seals 140.00
Gaskets, cam cover (2) 94.00
Distributor gaskets, cam cover (2) 12.10
Gasket, end plate (1) 2.55
Gasket, end plate (1) 2.66
Distributor gasket, cork (2) 6.96
Total $503.27
Why Did It Cost So Much?
I decided to change the camshaft seals, requiring the removal of the cams. Rutlands pointed out that since my last change, the seals had been improved (now they are rotational). Furthermore, I decided to replace the cam belt tensioner bearings, which had never been replaced in the past. All of this costs money, and additional time and effort.
|
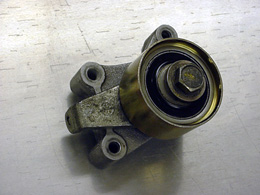 Althought there was nothing wrong with the old cam belt tensioner bearings,
I decided to replace them anyway. Be sure to dismantle, check and clean
the spring and plunger.
Althought there was nothing wrong with the old cam belt tensioner bearings,
I decided to replace them anyway. Be sure to dismantle, check and clean
the spring and plunger.
|
Since Ferraris leak more oil than an Iraqi pipeline, I though it smart to replace anything that could possible leak now or in the future. Well, maybe not so smart; I don't think that a 308 will ever be leak free, at least for long. If you think you know of one that is, you ain't sticking your fingers in the right places. The kit for the cam and distributor include cam seals for the front of the cam, o rings for the cam bolt, and seals for the distributor end of the camshaft. You will also need distributor gaskets to cam cover, and the two end plate gaskets.
A big bite of the bill was due to the cambelt tensioners, which weren't broken down on the invoice but cost over $100 each. Why did they need replacement? They are extremely critical, sealed bearings. Unique to Ferrari too, unlike most bearings which are standard throughout the world. If they fail, the result is the same as a broken cambelt, instant catastrophe. Mine were not bad. But replacing them after almost 20 years is a good insurance policy.
It is entirely possible and reasonable in many cases, to spend only the $40 or so on a set of cambelts, and do the job in a few hours. As usual, I took the hard and expensive way.
So let's get going. I am going to assume that our readers know all the basics, and that they have the time, place, experience and tools necessary to complete the job. I will only highlight some aspects of the job I found difficult.
You now have $500 worth of parts in front of you, and the cost of making a mistake can be as much as ten times that amount. Don't be rushed, don't take shortcuts, and don't forget things. Having a Senior Moment at the wrong time during a full maintenance tends to ruin one's pension.
Timing Marks and Lineup

The PMS marks on the flywheel are hard to see and always dirty.
|
While it appears that the cam timing marks are not in alignment, they
are. And they should be right on the money. Check for multiple marks!
|
It is critical that the camshaft timing marks be exact. Before dismantling, line the timing marks on the cams with the pms mark on the flywheel.
I used a TDC tool as well, but found that after repeated tests, the factory pms mark on the flywheel was right on.
There are two pms marks, one for the front bank, 5-8, and the other for the rear bank, cylinders 1-4. Use the pms 1-4 mark for setting up the marks.
Check to see that the distributor rotor is pointing to number one on the front bank. The pms mark will be dirty and very hard to see. Clean it thoroughly and make sure it is perfectly aligned with the pointer. Now check the camshaft marks, and mark with paint or chalk. All four should be perfectly inline with the marks on the cam bearing. Perfectly means just that. Make a note of their positions and mark them. There should be only one cam mark on each cam. However, I found two marks on one cam!!?, very close together, so be sure to mark the slot beforehand, just in case.
Cam Removal
|
 Bearing shim in place. A matchcover makes a good shim. Shim up all four
cams at one time, using the front and rear bearings. It does work!
Bearing shim in place. A matchcover makes a good shim. Shim up all four
cams at one time, using the front and rear bearings. It does work!
|
It is usually possible to remove the pulley nuts while the cams are still in the head. To do this, place a thin cardboard shim under the end bearing caps and re-install them. Do all four at one time. This will keep the cams from turning while you try to remove the nuts which hold the pulleys to the cams.
If this process fails to work, remove the cams with the pulleys and using the old belt to protect the pulley, place it carefully in a vice.
An Ounce of Protection...
Despite great care and years of hard won experience, it is possible to drop a nut, bolt, or washer. Ferrari dealers once would say that if a nut, washer or bolt was dropped somewhere, it better be found, as Murphy's Law number 4011 says the dropped object will end up in the wrong place and possible destroy the engine. I don't know if they still adhere to this adage or not, though, as it blows the hell out of a flat rate job.
|
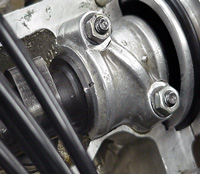
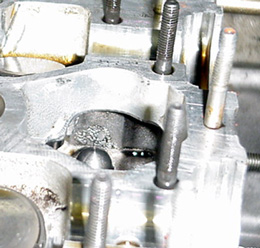 See that gaping hole? The image does not depict the degree of angle though--
nuts will fall right down into the head. Plug hole, save time and engine.
See that gaping hole? The image does not depict the degree of angle though--
nuts will fall right down into the head. Plug hole, save time and engine.
|
This is definitely a truism. On the far (front) bank, when removing the small, slippery 10 mm cam bearing nuts, one fell. I didn't hear it hit the floor. Looking about, it was obvious that the nut had fallen into the head cavity, where the head bolts and valve springs hide under the marvelous casting.
Murphy's Law 4011 said it had to be in there, but I couldn't see it. Show stopper. I finally threaded a long thin piece of plastic behind the exposed valve spring, and the nut magically appeared. A magnet extracted it once in sight. I can imagine what the exposed valve springs would have made of that 10 mm nut. Or what the nut would have made of the valve spring.
Lesson learned. Cover each head cavity with a rag before removing the nearby cam nuts.
|
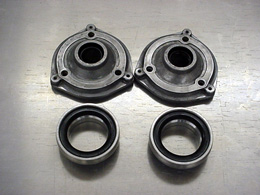 Cam seals are easy to install. New cam seals for the front of the cams are
now rotational.
Cam seals are easy to install. New cam seals for the front of the cams are
now rotational.
|
Remove the cams, noting the numbering and position of the cam bearings.
Remove the old belts, and belt tensioners. Install new tensioner after cleaning and checking the mechanism and springs. Remove the camshaft seals and install new seals and o rings. Be sure to pre-grease the seals whenever replaced. Replace the seals in the distributor end and lube.
You are now ready to begin the re-assembly process.